Leaf Blower
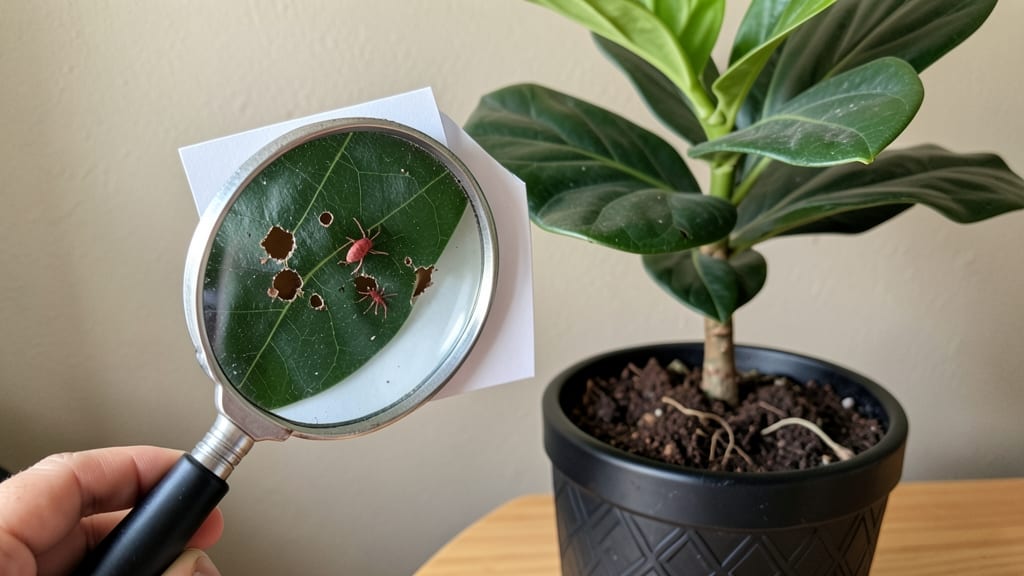
Seeing holes in fiddle leaf fig leaves looking like Swiss cheese? That’s the classic sign of dry edge damage—often from spider mites, thrips, or just plain thirst.
I’ve nursed back plants with holes so bad they looked beyond saving, and the fix comes down to hydration, humidity, and a little detective work to spot the real culprit.
The first step is identifying whether you’re dealing with pests (check undersides of leaves for tiny webs or specks) or environmental stress (crispy brown edges often mean underwatering). Either way, the solution starts with a thorough misting, a humidifier nearby, and a good soak—root ball and all.
For pests, insecticidal soap does the trick without harming your plant’s good looks. Within a few weeks, you’ll see new growth pushing out, and those holes will fill in with fresh, velvety leaves.
The key is consistency: keep soil moist (not soggy), boost humidity, and prune damaged leaves to redirect energy. Even severely stressed plants bounce back with the right care.
This works for any fiddle leaf fig, whether you’re battling mites in your dry office or just forgot to water during your last vacation. Let’s get those leaves looking lush again!
Root Causes Behind Leaf Damage
When your fiddle leaf fig starts developing mysterious holes, it’s rarely a sign of a happy, healthy plant. Instead, these unsightly perforations are usually a cry for help—often tied to environmental stress, pest invasions, or even human error.
Understanding the why behind these holes is the first step to restoring your plant’s lush, hole-free glory. Let’s break down the most common culprits, backed by science, so you can address the issue like a pro.
Pests are the #1 reason for holes in fiddle leaf figs, and they don’t always announce their arrival with obvious signs. Here’s how they strike:
- Spider Mites: These tiny arachnids (not true bugs) thrive in dry conditions and use their needle-like mouthparts to puncture leaf cells, creating tiny holes while feeding on sap. Their webbing is a dead giveaway—but by the time you spot it, the damage is done. 💡 Pro Tip: Hold a white sheet beneath the leaves and shake the plant; mites will scatter, making them visible.
- Leaf Miners: The larvae of these flies burrow inside the leaf tissue, creating serpentine tunnels that eventually turn into holes. You’ll often see transparent, squiggly trails before the leaf weakens and tears. 🔥 Warning: Once a leaf miner moves in, the leaf is usually a goner—focus on treating the rest of the plant.
- Caterpillars & Slugs: Larger pests like caterpillars (from moths or butterflies) or slugs leave behind ragged, irregular holes as they chew through leaves. These are easier to spot but can decimate a plant overnight if unchecked.
Why does this happen? Pests target stressed plants—those with low humidity, dry soil, or poor air circulation. If your fiddle leaf fig is already struggling, it becomes a buffet for hungry invaders.
Fiddle leaf figs are tropical divas—they need specific conditions to thrive. When those needs aren’t met, the leaves react with holes, spots, or browning. Here’s how:
| Stress Factor | How It Causes Holes | Scientific Explanation |
|---|---|---|
| Low Humidity (<30%) | Dry edges, crispy holes, or leaf drop | Humidity below 40% causes osmotic stress—cells lose water faster than roots can replace it. The leaf margins dry out, turn brown, and crisp into holes as tissue dies. |
| Overwatering or Poor Drainage | Yellowing leaves with ragged holes | Waterlogged roots suffocate the plant, leading to root rot. The plant can’t absorb nutrients, causing leaf necrosis (cell death) that appears as holes or discoloration. |
| Temperature Fluctuations (<50°F or >90°F) | Sudden browning or tearing | Extreme temps disrupt photosynthesis. Cold snaps cause chlorosis (yellowing), while heat stress leads to protein denaturation—cells break down, and leaves tear or develop holes. |
| Direct Sunburn (Harsh afternoon sun) | White/yellow patches that turn to holes | UV rays overwhelm chlorophyll, causing photodamage. The affected cells die, creating bleached spots that weaken the leaf structure, leading to tears. |
🎯 Key Takeaway: Fiddle leaf figs are not desert plants—they need 60-70% humidity, consistent moisture (not soggy soil), and indirect light. When these conditions fail, the leaves pay the price.
Even the best-intentioned plant parents can accidentally harm their fiddle leaf figs. Here’s how:
- Over-Fertilizing:
Too much fertilizer (especially salt-heavy varieties) burns leaf tissue. The excess salts disrupt cellular uptake of water, causing fertilizer burn—which appears as brown, crispy holes along leaf edges.
- Physical Damage:
Rough handling, pet claws, or even dust buildup can weaken leaves. Dust blocks stomata (pores), reducing gas exchange and leading to stress-related holes.
- Improper Pruning:
Cutting too close to the stem or using dull tools can tear leaves, creating jagged holes. Always use sterilized scissors and cut at a 45° angle just above a leaf node.
- Sudden Changes:
Moving the plant from low light to bright sun or vice versa can shock the leaves. The abrupt shift in light intensity causes photoinhibition, leading to holes or bleaching.
✨ Quick Fix: If the damage is from human error, adjust care immediately. For fertilizer burn, flush the soil with water. For physical damage, trim affected leaves and avoid touching new growth.
Now that you know the why, the next step is action—but first, identify which culprit is targeting your fiddle leaf fig! 🌿
Fixing Fiddle Leaf Fig Damage
Now that you know what’s causing those pesky holes in your fiddle leaf fig’s leaves, let’s roll up our sleeves and get to work! 🌿💦 The good news? Most of these issues are reversible with the right care—and a few simple tweaks can prevent them from happening again.
Below, we’ll break down the fixes by cause, so you can target the problem like a pro.
If your fiddle leaf fig is drowning in soggy soil, the first step is to stop the waterlogged chaos. Here’s how to rescue it:
🔧 Step 1: Check the Roots Gently remove the plant from its pot and inspect the roots. If they’re mushy, dark, or smell foul, they’re rotting. Healthy roots should be firm and pale.
💧 Step 2: Trim the Damage Use clean, sterilized scissors to snip off any black, mushy roots. Focus on saving the healthy parts—your plant will thank you!
🏡 Step 3: Repot with Fresh Soil Choose a pot with drainage holes (if it doesn’t have them, drill a few!) and fill it with a well-draining potting mix designed for tropical plants. A blend of peat, perlite, and bark works wonders.
🚰 Step 4: Adjust Your Watering Routine Let the top 2-3 inches of soil dry out completely before watering again. Stick your finger in the soil—if it’s damp past the first knuckle, wait a few more days.
💡 Pro Tip: If repotting feels overwhelming, try the "soak and dry" method—water thoroughly, then let it drain completely before placing the pot in a tray of water for 10-15 minutes. This mimics natural rainfall without overdoing it.
Fiddle leaf figs love humidity, and dry air can turn their leaves into a snack bar for pests or cause crispy edges. Here’s how to bring the moisture back:
💦 Step 1: Mist Regularly Lightly mist the leaves 2-3 times a week, especially in dry climates. Use room-temperature water and do it in the morning so the leaves dry quickly.
🌧️ Step 2: Use a Humidifier If misting isn’t enough, invest in a small humidifier near your plant. Aim for 40-60% humidity—your fiddle leaf fig will thrive like it’s in its tropical homeland.
🏠 Step 3: Group Plants Together Place your fiddle leaf fig near other houseplants. They release moisture through transpiration, creating a mini humid microclimate.
🚿 Step 4: Try the Pebble Tray Trick Fill a shallow tray with pebbles and water, then place the pot on top (ensure the pot isn’t sitting in water). As the water evaporates, it’ll boost humidity around the plant.
✨ Pro Tip: Wipe the leaves down with a damp cloth every few weeks. This cleans dust (which blocks humidity) and gives your plant a spa day!
If those holes are thanks to spider mites, mealybugs, or thrips, it’s time for an extermination party—but the eco-friendly kind!
🔍 Step 1: Identify the Culprit Hold a white sheet of paper under the leaves and shake gently. Tiny moving dots? Likely spider mites. Cottony white blobs? Mealybugs. Tiny black specks? Thrips.
🧼 Step 2: Isolate the Plant Move your fiddle leaf fig away from other plants to prevent a full-blown pest party. Quarantine is key!
💦 Step 3: Blast Them Off Spray the leaves (top and bottom) with a strong stream of water to dislodge pests. Repeat every few days for a week.
🌿 Step 4: Treat with Natural Remedies
- Neem Oil Solution: Mix 1 tsp neem oil + 1 tsp mild soap + 1 quart of water. Spray on leaves and repeat weekly.
- Rubbing Alcohol Wipe: Dip a cotton swab in rubbing alcohol and dab directly on pests (great for mealybugs).
- Insecticidal Soap: Follow package instructions for a chemical-free kill.
💡 Pro Tip: Introduce beneficial insects like ladybugs or lacewings—they’re nature’s pest control!
If your plant’s leaves are getting too much sun or sitting in a drafty spot, it’s time to find a happy medium.
🌞 Step 1: Adjust Light Exposure Move your fiddle leaf fig to bright, indirect light. East or north-facing windows are ideal. If it’s getting too much sun, try a sheer curtain to diffuse the light.
🌬️ Step 2: Avoid Drafts Keep your plant away from AC vents, heaters, or open windows during cold drafts. These temperature swings stress the plant and weaken its defenses.
🌱 Step 3: Rotate the Plant Every few weeks, turn the pot a quarter turn. This ensures even growth and prevents one side from getting too much direct light.
🎯 Pro Tip: If you notice new growth is leggy or pale, it’s getting too little light. Gradually increase exposure over a week to avoid shocking the plant.
Once you’ve fixed the problem, lock in those healthy habits with these easy maintenance tips:
- Water wisely: Stick to the soak-and-dry method and always use pots with drainage holes. - Monitor humidity: Use a hygrometer to track levels—aim for 40-60%. - Inspect regularly: Check leaves weekly for pests or early signs of stress. - Dust those leaves: Wipe them down monthly to help with photosynthesis and humidity retention. - Fertilize lightly: Use a balanced liquid fertilizer (like 20-20-20) every 6-8 weeks during spring and summer.
Cut back in fall and winter.
Your fiddle leaf fig is tougher than it looks—with these fixes, it’ll bounce back stronger than ever. 🌟 Soon, those holes will be a distant memory, and you’ll be admiring lush, vibrant leaves again. Happy growing!
Frequently asked questions
Why do fiddle leaf fig holes look like Swiss cheese?
Those tiny holes are usually from spider mites or thrips, which puncture leaf cells while feeding. Environmental stress like low humidity or underwatering can also cause dry edges that crisp into holes. Check leaf undersides for webbing or tiny specks—those are your clues!
Can I save a fiddle leaf fig with severe holes?
Prune heavily damaged leaves to redirect energy to new growth. Focus on fixing the root cause (pests, humidity, or watering) and maintain consistent care. Within 4-6 weeks, you’ll see fresh, hole-free leaves emerging from the stem.
Is neem oil safe for fiddle leaf figs?
Yes, when used correctly! Mix 1 teaspoon neem oil + 1 teaspoon mild soap + 1 quart water and spray leaves weekly. Always test on one leaf first—some plants are sensitive. Avoid overusing it, as too much can stress the plant.
How often should I mist my fiddle leaf fig?
Mist 2-3 times weekly in dry climates, focusing on leaves in the morning. For extra humidity, pair misting with a pebble tray or small humidifier. Avoid misting at night to prevent fungal growth—your plant needs to dry completely.
Will the holes fill in naturally?
No, holes won’t "heal" like human skin. However, new growth from healthy stems will push out fresh leaves. Prune damaged foliage to encourage this regeneration. The key is addressing the underlying issue first—whether it’s pests, light, or humidity.